Sunday 6 April 2014

Effey the Heffalump and Jeff the Giraffe


I am getting quite addicted to the african flower motif animals by Heidi Bears.

For Effey I used Stylecraft DK: cream, jaffa, aspen and yellow.  I used a size 3mm hook.

I made her with her trunk curled upwards as I think they look nicer like that.  She is for my youngest daughter's birthday in May.


For Jeff the Giraffe, again another Heidi Bears pattern, I used Stylecraft DK: cream, turquoise, shrimp and spring green.  I used a size 2.5 hook.  I really enjoyed making Jeff as it was a little more than just making the motifs and assembling.  You had the ears, horns and mane to do. I think he looked rather handsome!  He was made for my eldest daughter's birthday in May (also). She will be 19 - never too old for a soft toy.  Here are a selection of photos of Jeff:


Ellie and Jeff

Ellie and Jeff

Tuesday 26 November 2013

Leyton Orient Football Scarf

I was asked if I could crochet a scarf with the initial 'LOFC' on each end.  Again a new challenge for me but one I was happy to take on.

First I had to find the right colour red as not any old red would do.  So with the help of the very helpful ladies at Deramores, who searched their wool stock against a images on the web of the football club's strip, I was able to narrow down the red to one or shades.  The customer went with Rico Baby So Soft red and Rico Baby So Soft snow.

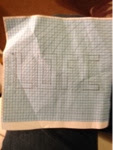
My next step was to make a graph for the lettering, which I did as below:


Then I just did alternating bands of red and white and put some tassels at each end.

This was a nice quick job and I was pretty happy with the outcome.


Teddy Bear Baby Blanket

Summer has gone and autumn/winter is here.

During this time I had news that a cousin of mine was expecting a baby late October.  So I hunted for a pattern that would slightly challenge me but not too much.  Famous last words.

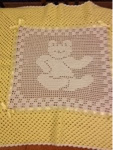
I found a lovely teddy bear filet blanket, designed by Cylinda Mathews at www.crochetmemories,com. I used Stylecraft Special DK in lemon and white.  I also got some pale lemon ribbon for threading through the the eyelets and tying into bows.

That doesn't look too hard I thought.  Started off ok until I got to the teddy bear and then I realised that you had to remember which direction you're coming from otherwise it doesn't look right from the right side. Yes.......I did have to do some frogging, in fact plenty of frogging.

Baby arrived a little late; Kitty Primrose and the blanket is winging its way to her as I type.

I hope she will be all snuggly in it.


Sunday 18 August 2013

Minstrel the doorstop

I was asked to make a cat doorstop.  I've not done much amigurami so searched for an easy skill pattern and found this: Amigurami Black Cat Door Stopper which can be found on the Lion Brand (pattern number 90695AD).

Feeling slightly anxious, I was about to make a start when they asked if I could make it to look like their cat......that is to say, the same markings as their cat.  Fortunately, it is a black and white cat and not a tortoiseshell.  So after many photos sent, I drew a rough sketch of the cat and with its markings.  Here are all the parts:


Head with eyes, nose and whiskers
             
Then I added the eyes and stitched on the nose, whiskers and ears and stuffed the head and it started looking more like a cat. I lightly stuffed the ears so that they had a softer feel to them. I stuffed the tail by using the end of a large hook to poke the stuffing in.


With this project, I decided against using sand and went for curtain weights.  I used about 25 which I put inside a bag. You can get them in fairly large quantities off ebay. 

curtain weights

After I had stitched him altogether, I gave him a nice red collar to complete his appearance.  I think he looks rather smart and was pleased with how he turned out.


Friday 9 August 2013

Holiday with Happypotamus

I was wondering what I could take on holiday with me to crochet, when someone who had seen my Happypotamus (see June's African Flower Motif Hippo blog) asked me if I could make her one.  Great, I thought.....I can make the motifs on holiday and assemble it when I get home; doesn't take up much room and only 4 balls of wool.

The lady chose her colours: purple, off white, dark dusky pink and a light mixed fleck pink.  So on the days that we decided to chill out, I sat outside and did some crocheting.


Excuse the hair, it went a bit lank that day :-)

We had a lovely holiday on a campsite in France.  While I was crocheting a young lad in the next caravan saw me and came over and asked what I was doing.  So I showed him how I was doing the stitches and explained that I had to make all the flower motifs and then stitched them together to make a hippo.  At this point I showed him the photos that I had taken on my previous hippo.  He was amazed and had to go and tell his parents, who then had to come and have a look as well.

I came home with pile of motifs: 


This time I decided not to do any of the ends until I had done all the rounds and it made for a much neater finish.  I was much happier with the stitches.  I had read that someone in one of the crochet groups I belong to, saves all the ends and then uses them to stuff toys that she makes.  I thought this was a good and idea and it is amazing how many ends you have at the end of a project. 


Here is the finished Happypotamus: 21" long by 8.5" tall.


I have another week in France, different region, in a couple of weeks, so will have to think of another holiday project.


Holiday hippo (as he was called) was safely delivered to his new owner and given the name, Humphrey.  I am very pleased that  he has gone to a good home and will be cherished.

Just before he went off, I received my new labels which I ordered from 'gblabels'.  I am very pleased with them.....fast and efficient service which is more than can be said for Woven Labels who managed to get my order wrong twice.


Sunday 7 July 2013

Sheep Shearing in the Wop Wops

Ok so not quite in the wop wops, but close.  To you non-New Zealand people, to be in the wop wops means to be in the middle of nowhere.

With this sudden heatwave we have had in the UK, my mind turned to my 2 sheep.  They are a cross between a Soay and a Jacob.  Rosy is 12 and Cassy is 11.  I did have a ram, Toby, but unfortunately I came home to find him dead in the shed when he was only 5.

Toby and Rosy had to be bottle fed and were very cute.  They lived in the utility room until my husband finished building them a shed and they had been weaned; which turned out to be 4 weeks.  I had to lay plastic sheeting down to protect the carpet and then put sheets and towels on top of it (which needed washing every day).

Toby (in the front) and Rosy
As you can see they are not the cuddly looking white sheep. They have quite a different nature as well...they are little battlers and eat everything.  They managed to kill all the trees in their area but eating the bark off them.

This is what Rosy and Cassy looked like first thing this morning, before I got my scissors out!  They don't like being flipped on their backs and so I have employed a different method.

Rosy (in the front) and Cassy

One of the chickens obviously was feeling left out and wanted her photo taken as well :-).

See the big horns?  Yep, well worth keeping out of their reach....they hurt when they make contact.  So, my husband has to hold onto their horns while I clip them with a pair of scissors.  2 hours later of back-breaking cutting and they look very smart and much slimmer.

Cassy being restrained but about to be released
Cassy

Cassy

She seems a little thin for my liking so will have to keep an eye on her and Rosy (she also seem a little thin).  They are eating the same amount so I'm wondering if it has something to do with their age.

Rosy

Well, that is done for the year.  I have 2 lots of wool to be disposed of.  I sometimes leave it for the birds to use for their nests.


 However, my husband said that I should spin it.  So this might be worth thinking about next year when my studies finish.  If anyone reading this has any useful information, then please leave me a message.  In fact, just leave me a message, I love getting them :-)

Monday 17 June 2013

African Flower Motif Hippo

I am starting to have more work-in-progresses than I have actual finished pieces!!

Today a friend and I decided to start a crochet-along to celebrate the end of our current courses.  So we have decided to have a go at the Happypotamus design by Heidi Bears.  I am using Stylecraft yarn: plum, meadow and fiesta; James Brett baby vanilla. I am using a 3mm hook.

It is a mixture of different shaped african flowers....it is amazing what she has produced......so imaginative.

Today we managed to do 6 shapes...only another 38 to go; it should keep us out of mischief for awhile.  Although we live 100 miles apart, we can still have a good laugh via facebook messenger and send pics of how we're getting on, or showing how to do something if we're a little confused.  Unfortunately it does prove how difficult it is to count to 7 as we're not fully concentrating on what we're doing and so there has been a fair bit of frogging going on.  All part of the fun though.

Here are 2 of the shapes we did today:

Pentagon flower (top) and Hexagon flower

A friend has come up with a very good suggestion, so I shall be playing around with that soon and see how it looks before I say what it is.

It's a lovely pattern and I admired it some months ago but it was far too advanced for me and I was rather scared by it.  However, the only new stitch was a long treble crochet, which now I am more confident, didn't phase me at all!  It is really amazing how fast you progress with crochet.

Today we did some more pentagons; we need 26!!! I also did a heptagon:
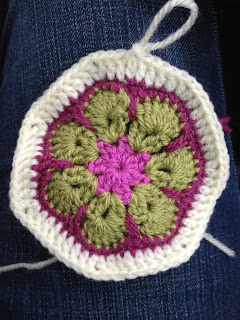
Heptagon

Didn't get much done today :-(.   I did a lot of centre pieces ready for tomorrow and the nose square; something is better than nothing I suppose
Nose square


Seems a little bare without the long treble stitches.

Another terribly non-productive day......well when the weather is behaving, it is a good idea to do some gardening.  Today I did a couple more pentagons and an octagon.
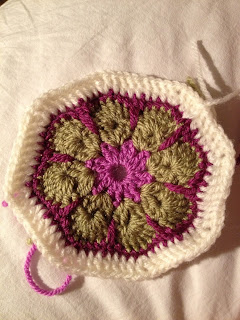
Octagon

I have hit the half way mark: 17 pentagons, 1 octagon, 2 heptagons, 1 hexagon and a nose patch.  I have got plenty of darning in of ends to do but it is very satisfying seeing the pile of motifs getting bigger.  Would you like a peek?  Oh all right then :-)
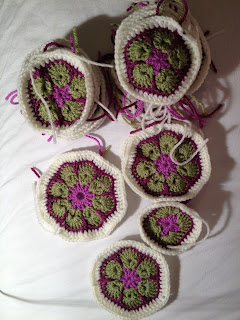
I can't wait to see this in its final form.  I'm thinking of turning it into a doorstop for the lounge....the colours will go perfectly there.

After so long all the motifs were made....they were overflowing out of my little tin.


Now came the tricky bit......assembly time.  It was a bit of a challenge.  I decided to sew mine together as I couldn't get to grips with Heidi's 'join as you go' method, however, I think it probably is worth persevering and mastering it (I shall do this next time).  Yes, even though I was starting to get bored with making all the motifs, there will be a next time.

I'm not going to say exactly how he was put together as you can see for yourself by clicking on the 'happypotamus' link above.

Ok I will show a little bit:  first came his legs, and what lovely little legs they were :-)
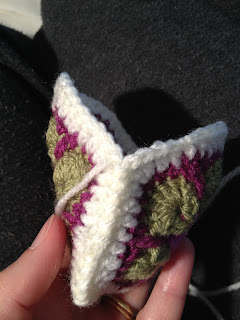
one leg

Once I got the hang of it, he grew quite quickly:


As I had decided to make him into a doorstop, before I filled the body with toy stuffing (and boy did he eat some stuffing - well I don't suppose they get to that size on nothing), I filled some sandwich bags with about 2 tablespoons of play sand and tied the tops securely.  I put a bit of stuffing in and then the sandbags and then more stuffing around them so that you couldn't feel the bags and then continued to fill his body.

Sewing the head on was quite a performance; he needed locking into place....my legs came in handy here, whilst sewing and he needed to manipulated a lot but it was very exciting as he was nearly complete.  The last motif was in place and hurrah, only the ears to do - only to find that my last 2 shapes had to have the last round frogged and redone as it wasn't to be completed like the others..........it would have been useful to have mentioned this at the beginning as is was a little demoralising to have to pull work apart at this late stage.   Never mind, they were done and stitched in place.  But something was missing.......something was anatomically wrong with this hippo......as lovely and splendid as he was........that's right, no tail.  Well I couldn't leave him like that so I fashioned him a lovely tail, after having looked at lots of images of hippo's tails on the internet. I made a teardrop shape and stitched the pointy end together and stuffed it as much as I could.  I left the fatter end open and put some stuffing in there and sewed it onto his bottom.  Oh and I added some hairs as some of them have a bit of a hairy tail :-)

Drum roll.............and now I would like to introduce you to CLAUDIUS!